Create cases
Here is an overview of how to quickly create a new case in Uniify and send a flow to your customer.
How to create a case
Start the process:
Click the blue Create Case button in the top right corner of your dashboard.Choose Type and Name:
Select the case type you want to create. Give the case a Label (typically the customer's name) so it’s easy to find in your overview.Reference (Optional):
Add a Reference if you have an internal case number or project ID that you’d like to search for later.Primary Entity:
Enter the name and email of the recipient. This is also where you select the Language for the email invitation.Select Flow:
Choose the specific onboarding flow your customer needs to complete.Sending the flow:
Check the "Notify via email" box and click Create Case. The customer will immediately receive a direct link to their flow.
Make a great impression from the start
Did you know that we can create a unique email invitation for each of your flows? Read more here
Send a link manually
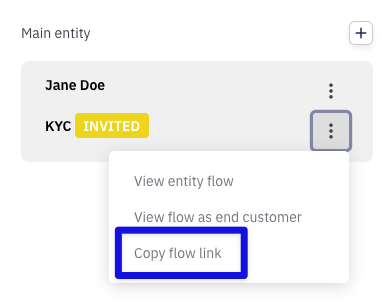
If you prefer to send the invitation via your own email or chat, you can retrieve the link manually after the case has been created:
Open the case.
Click the three dots (⋮) under 'Primary entity'.
Select Copy flow link.
Generic link: We can also create a generic link that can be placed behind a button on your website, allowing customers to start the process themselves. Contact support to learn more about this solution.
Need help creating cases?
If you have questions about the different case types or want to learn more about self-service links for your website, don't hesitate to reach out via the chat or at support@uniify.io.